
Ms-Word 2007
Work Area Basics
Word is a word-processing software comes with Microsoft Office Package. From Word 2007 version Microsoft removed the Menu and Toolbars with Tabs and Groups. Default filename of Word version 2007 is document and extension is .docx.
New Features of Word 2007:
Office Button
Tabs, Ribbon and Groups in the place of menus and toolbars
Quick Access Toolbar
Office button and Quick access toolbars contain basic commands necessary for file operations.
Customizing Quick Access Toolbar:
Right click on empty space of tabs–>customize quick access toolbar
(or)
Click on down showing arrow at right side of Quick access toolbar
Ribbon contains groups of different icons for the tab selected.
Show/hide Ribbon:
Right click on ribbon–>Minimize ribbon to hide
Click on empty area of tabs–>minimize ribbon to show
Some Groups contain arrow at lower right corner that opens a dialog box
Moving between Tabs using Keyboard:
Press Alt to activate Tabs with Hot keys
Press the hot key to open the tab with hot keys for groups and commands (or) use arrows to change between tabs
Press Esc to deactivate Hot keys
Creating new File:
Office button–>New (or) alt+f+n
Select blank document–>OK
Opening an existing document:
Office button–>open
Select a folder–>Select word file–>Open
Saving document:
Office button–>Save/Save As
Select location of folder
Type a file name
Saving Document in other format:
Office button–>Save As
Select the format in File Type list box
Type the file name if you want
Select the location of folder if you want
Show/hide ruler:
view Tab–>show/hide group–>ruler checkbox
Setting up size and margins of page to be printed:
Page layout Tab–>Use buttons in Page Setup group
(or)
Click on right arrow on lower right corner of Page Setup group of Page Layout tab to open Page Setup dialog box
Printing and previewing a document:
Office button–>print
Viewing document using different views:
view tab–>document views group
Changing Magnification Level of page:
View Tab–>Zoom Group
(or)
Drag the Zoom slider at lower right corner of Word 2007 window.
(or)
Ctrl+scroll the mouse
Insert Sample Text for Practice
=rand() functions inserts sample text to test and work on the features of Ms-Word. The rand() functions with no arguments inserts 3 paragraphs of 5 sentences each. You can also specify number of paragraphs and sentences to be inserted with rand function
=rand(paragraphs,sentences)
Moving Cursor within Document
Moving Cursor with Keyboard:
- Use arrow keys to move one character(left/right) or one line(up/down) at a time
- Ctrl+Arrows to move one word(left/right) or one paragraph(up/down) at a time
- Home key to move to beginning of line
- End key to move to end of line
- Page up to move to one page up
- Page Down to move to one page down
- Ctrl+PageUp/Down to place cursor at the top of each page while scrolling
- Move to the beginning/end of the document: Ctrl+Home/End
Formatting
Selecting Text
Text Selection methods with Mouse:
- Drag over the text to be selected
- Double click to select one word at a time
- triple click to select one paragraph at a time
- click either side of text block, hold shift and click at other end of text block
Text Selection methods with keyboard:
- hold shift, use arrow keys to select one character at a time
- press home/end, hold shift, press end/home to select one line.
- hold ctrl+shift, and use arrow keys to select one word/paragraph at a time
- ctrl+A to select all
Text Formatting
KBS for Formatting Styles:
Bold: Ctrl+B
Italic: Ctrl+I
Underline: Ctrl+U
Superscript: Ctrl+shift++
subscript: ctrl+=
To change font size by one point:
Increase: Ctrl+]
Decrease: Ctrl+[
To change font size by standard point:
Increase: Ctrl+shift+>
Decrease: Ctrl+shift+<
Changing from smaller case to upper:
- select block of text or click on a word for which case to be changed
- Home tab–>font group–>change case button
- Sentence case: first letter of each sentence to be capital
- Lower case: all letters to be lower case
- Upper case: all letters to be upper case
- Title case: first letter of each word to be capital
- Toggle case: Smaller to be changed to upper and upper to be smaller
Paragraph Formatting
Home Tab–>Paragraph Group
KBS for Alignment:
Left: Ctrl+L
Right: Ctrl+R
Center: Ctrl+E
Justity: Ctrl+J
Line Spacing:
Single: Ctrl+1
1.5 points: Ctrl+5
Double: Ctrl+2
Indentation:
Increase indent: Ctrl+M
Decrease indent: Shift+Ctrl+M
Bullets and Numbering
Bullets and Numbering format can be used to create list style of information.
Bullets can used to create unordered list whereas Numbers can be used to create ordered list.
Applying Bullets and Numbering:
- Home Tab–>Paragraph GroupàNumbering/Bullets Buttons
- type a list item–>press enter to create next bullet/number
- press tab to create sub point
- press shift+tab to convert subpoint to main point
- press enter twice to come out from bullet/numbered list
Page Formatting
Changing Background of document:
- page labout tab–>page background group–>page color
- Select a color or No fill in the sub menu
- More colors to create custom colors
- Fill effects to apply more than one color or pattern or picture as background
- Printed Watermark to specify a text or picture to be printed as water mark to secure content of document (use Watermark button in the same group)
Applying Borders and Shading:
Page Layout Tab–>Page background Group
Insert Table
Inserting Tables
- Insert tab–>tables group–>Table button
- Drag to specify Number of rows and columns
(or)
Insert tab–>tables group–>Table button–>insert table
- specify number of rows and columns
- Select autofit behaviour from these options:
- Fixed Column width
- Autofit to content
- Autofit to Window
Draw Table:
- Insert tab–>tables group–>Table button–>draw Table
- Use draw table icon to draw rows, columns and cells of table as you wish
- Use Erase icon to erase parts of table
- Line Style, width can be specified
- Border Color, Border Style and Shading Color can also be specified
Enter, select and format data in Table:
- Click inside a cell of table
- Enter data–>tab/arrow
- Press Enter to insert text with multiple lines
- Hold shift, use arrows to select columns or rows
- All font, paragraph formatting options can be applied to data in the cells.
- table tool–>table styles group–>use borders button for custom borders; use shading button for custom shading (or) select predefined styles
Resize columns/rows:
Drag column or row within table or on the ruler
Insert/Delete Rows/Columns/Cells:
- Click inside a cell (or) select a row/column
- right click–>Insert –>Rows above/below (or) column left/right
- right click–>Delete–>columns/rows/cells
- To delete cells, specify the adjustment to be done for the rest of cells in the table or you can insert/delete entire column/row of current cell
Merging cells into single cell:
- Select the cells to be merged
- right click–>merge cells
Dividing cells into columns or rows:
- Click inside a cell
- right click–>split cells
- Specify number of rows and columns
ILLUSTRATIONS
One picture is worth more than 1000 words – it is always useful in understanding some text matter, when there are some pictorial examples or graphical representations are added to that. The illustration group of insert tab is useful to add such type of illustrations to our word document. We will what is their significance and how to add them to our document and modify them as per our need.
Insert Picture dialog box appears with the following options
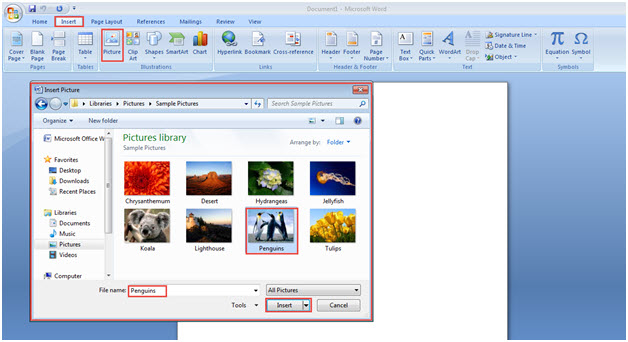
Select location of the picture file, name and click on insert.
Your selected picture will appear at the cursor position in your document.
Editing Pictures
Once a picture is inserted, you can see corner handles at the corners of your picture and rotate handle at the top middle. You can use them to resize and rotate your picture as per your need.
Format contextual tab will be added to your existing tabs, when you select the picture. It will provide various options to modify the picture.

Inserting Cliparts
- Insert tab–>illustrations group–>Clip art button
- In Clip art taskpane, type a word or category name, press Go
- Select the Location of clipart in Search in drop down list
- Select type of clipart to be viewed in Results should be list box
- From the list of cliparts displaying
- Double click a clipart (or)
- Click on right side arrow of a clipart–>Insert
- Drag the clipart onto document
Insert Pictures:
- Insert tab–>illustrations group–>picture button
- Select a picture from respective location
Editing Pictures/Cliparts:
- Click on picture/clipart to activate picture toolbar and resize handles
- Use resize handles to resize the picture/clipart
- Click on color button to change color
- Use contrast and brightness buttons to change contrast/brightness
- Crop button terminates unwanted portion of image
- Rotate button rotates the picture in anti-clock wise 900
- Text wrapping button determines adjustment of picture/clipart with surrounding text
- Format picture button opens dialog box with options
- Use rotate handle to rotate picture
- Right click–>ungroupàchange/remove contents(for some cliparts only)
- Right click–>Order–>Select a display order for the item
(or)
- Right click on picture/clipart
- Select format picture
- Page Tabs of Format Picture Dialog box:
- Colors and Lines
- Size
- Layout
- Picture
- Reset button cancels all changes you made
Inserting Autoshapes
- Insert tab–>illustrations group–>shapes button
- Select shape
- In Drawing Canvas draw the shape
- Click and crop drawing canvas (or) drag the shape outside canvas and delete canvas
Inserting WordArt
- Insert tab–>text group–>WordArt button
- Select a Word Art Style
- Type your Text
- Click on your text to activate word art toolbar
- Use Edit text button to modify the text
- Word Gallery button allows to change the style of Wordart
- Word Art Shape provides various shapes for the word art
- Format word art provides options to change visual properties of word art
Inserting Symbols/Equations:
Insert tab–>Symbols group–>symbol/Equation button
Insert Page Numbers
- Insert tab–>Header & footer group–>Page Number
- Select the position of page number on the page in Position list box
- Select an alignment for page number in Alignment list box
- You can determine whether you want the page number in the first page or not by Show number on first page
- Click on Format button to select style for the page number
Insert Breaks
Insert tab–>pages group–>page breaks button (for page break)
(or)
- Insert tab–>page setup group–>breaks button
- Page break stops current page and starts next page
- Column break starts next column
- Text wrapping break starts next paragraph
- Section break starts new section
- Options for Section break:
- Nextpage: starts next section in next page
- Continuous: starts next section in same page
- Even page: starts next section in next even numbered page
- Odd Page: starts next section in next odd numbered page